Tuesday, December 18, 2012

Littles--Bookmarks

Bookmarks made with my embroidery unit.  Did a little eyelet stitch with machine. Put fray check on edges 
Every month I send out a newsletter to about 25 ladies from church, a few friends, and my daughter.  When it's their birthday month, there's a little extra something included--some years it's a tiny baggie filled with confetti, sometimes it's been a little candy, one year it was appliqued flower coasters, a hanging birthday greeting, etc.  I try to make up enough for everyone for the year at one time--doesn't always happen!  Anyway...this is what was included this month.  
Base for bookmarks using my cording foot and metallic yarns and tiny ribbons.
Hooped black and gold fabric for backing and base material with pellon between  for stiffness.  Used  small rectangular borders  to delineate three bookmarks.  After embroidering, I used a tiny straight stitch around the edges to make sure everything was sewn down well before cutting out.  
Before cutting them out.  Will use scraps for another project.  Bought a bag of threads and tiny ribbons years ago .  Did a serpentine stitch to hold them down.  Love making "new" fabrics using embellishments.  Wanted something flat for mailing. These were fun and easy to make.  I've couched various threads/ribbons/yarns for years without the cording foot, so if you don't have the foot try this anyway.  My daughter has a different foot with fewer but bigger holes.


Friday, November 30, 2012

Celebrating Christmas in Cloth


Nativity I made for grandkiddos 9 years ago.  Wanted something they could play with and saw something somewhere online that inspired me.  It's all free form stitching using stitches on my machine except faces that I did with embroidery designs bought for my machine.

Saw this Swirly Christmas tree wallhanging on Craftsy
http://www.craftsy.com/pattern/quilting/home-decor/swirled-christmas-tree-quilt-pattern/17664 and had to have it.  Made three of them this year using Steam a Seam.  Used swirls in quilting, but they get a bit wonky in the colored areas where I was trying to get all the ends and edges of the prettiness.  In last one also sprinkled in some stars near the top.  


 The strip wallhanging uses leftovers from my Christmas quilt I've posted about over at The Christmas Quilt Festival  http://www.quilting-tutorials.blogspot.com/p/2012-christmas-quilt-show.html 
First saw the ornaments runner at my lqs: The Attic Window.  It's from the book My Runners that was found at Amazon, too.  Made it this year.  FMQ was swirls and stars with Merry Christmas written at either end near tree limbs.
Snowman quilt, made using free designs called Snowbound by Bunny Hill.  I used pinwheel blocks instead of what they suggested.  It's one of the favorite quilts I've ever made and my grandkiddos love it.

Friday, November 23, 2012

Christmas Quilt Show

There's a Christmas Quilt Show going on over at Michele Hester's:  http://www.quilting-tutorials.blogspot.com/p/2012-christmas-quilt-show.html
.  Have wanted to join this for a couple years but never remember to get it done.  This year I saw an email about it, so decided to add my quilt from a year or so ago.  I found a book with over 300 block ideas for Christmas and made a lot of blocks from those pictures and directions; also made some extras found online or made up such as the candy cane one.
Finished quilt...obviously not symmetrical, but it's how it came together considering all the different sized blocks I ended up with!!  The three large red squares have Christmas sayings, plus the red border and dividing pieces have some wording on them--like my grandchildren's names.
Backing--just kept growing and growing with scraps I had left over.

Got a Kate Spain Christmas fabric layer cake in 2010 I think and had lots of fun making up blocks. Most are from a book already mentioned on here: 301 Country Christmas Quilt Blocks by Cheri Saffiote, printed 2002.

One of my absolute favorite squares.
Made several star blocks using fussy-cut pieces for centers.
Love this little angel block.  Ended up making a lot of blocks and have several left overs
need to make into something small.
My daughter says this is her favorite...he's pretty cute I think, too.
http://www.blogger.com/blogger.g?blogID=7854712989797547840#editor/target=post;postID=1843900617486082048
  shows several of the blocks sewn into sections.

Enjoy the festival.  And have a wonderful Christmas season.

Sunday, November 18, 2012

Batik Strata Quilt

This is how I envisioned the quilt--strips going horizontally.
 Saw a strata quilt somewhere in last year or so.  It was made similarly to this one with colored strips about 2 1/2 inches wide and about 40 inches long, same size for white muslin strips.  Really wanted to make one for  grandniece Sabra and her hubby, Ben who got married last November.  It's taken me awhile to finish as I was making the Interlocking Seasons and working on several other things.  

Inspirational one was a rainbow quilt and it used printed cottons.  This one uses sets of batiks in blues, pink/oranges, greens and blue/purples.  There are 28 strips.  Used all materials I had on hand except for a couple orange scraps my dear friend Shirley gave  me from gorgeous quilts she's made.

To make each strip, I sewed a batik piece to muslin piece to form a continuous loop, then randomly cut the white pieces so there'd be one on either end of colored ones.  In one instance the colored goes clear to edge, otherwise they varied.  Love randomness of it.  
Another way to use the quilt--it's square
Below shows part of backing.  It includes a bunch of good wishes to the couple.  I cut small pieces of freezer paper and ironed to back of muslin, put them in a basket with various colors of washable-ink pens and instructions,  this was passed around at a shower and also at their reception.  After getting them back, they were ironed to set ink and sewn together into strips to be inserted in backing.  
This is part of the backing showing some of the good wishes pieces.


Not the best picture but it shows some of the quilting.  All batiks had just a serpentine sort of design.  Muslin had a different design in every strip and tried to alternate a geometric sort of design for a more organic one.  Had fun making them up and used designs that were in my fmq diary.  Some designs were from others, too.

Strips for the quilt.

Color sections sewn together--greens and purply ones.

Up close on mostly blue section
Showing backing in progress
In midst of making this and trying to quilt a baby quilt, my Brother Duetta decided to throw a fit--it literally started screeching and then totally refused to work!  Hadn't been in for a "spa treatment" for a long time. But the shop from which I got it and where it usually goes is 88 miles away and over two mountain passes with lots of snow on them.  I spent a couple hours fishing out a LOT of lint and then oiling it--supposed to let repairman do that, but needed it to work now!  After awhile fly wheel would move a bit and then little by little it started working again.  After I got the baby quilt done, and two strips of this quilted, the Duetta decided to break stitches every inch or two---SOOOO fun--HA!  Decided to give my 1976 Pfaff a try.  It was ridiculously slow and with my wonderful shoulders, just not going to work since it would take me about four or five times longer per strip to sew.  New sales/repair place in town has both of those machines and hubby got me a "Baby Brother" from Costco for $140 that worked well to finish this since they're backed up two weeks or more.

Have a picture of dear hubby pinning the quilt but he said I couldn't use it!!  He's always so good to measure/cut batting, sandwich quilts and pin them for me.  Ben and Sabra came by today and we gave them their quilt--on their one year anniversary, no less!  They loved it...Sabra spent all the time looking at the quilting so that was fun she enjoyed it!  Forgot to get a picture of them with it, but have the memory of them sitting under it while they were here.

Saturday, October 27, 2012

In The Leafy Tree Tops--Deux

Meant to include lyrics to In The Leafy Tree Tops song, which is one I sang to and with my children their whole lives.  I've just found out it's one of my twinnie girlie girls' (granddaughters) favorite song. Anyway: here are the lyrics, and down below is a hotlink to the music that you can listen to and print out if you wish. 

In the leafy tree tops the birds sing, "Good Morning."  They're first to see the sun; they must tell every one.  In the leafy tree tops the birds sing "Good Morning."
In my pretty garden the flowers are nodding.  "How do you do?" they say.  "How do you do today?"  In my pretty garden the flowers are nodding.
That last verse has always been a bit confusing to little children, who would often ask why the flowers were naughty as that's what it sounded like to them!  

In The Leafy Tree Tops--The Birdies Are Singing

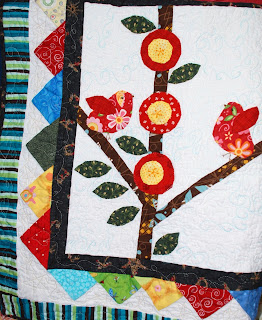
Full Quilt is about 36 x 45.  From Material Obsession quilt book my son and                                                                                daughter in law gave me for Christmas a couple years ago.   It has lots of wonderful
quilts.
Detail of bottom left.    Did swirls in the white "window" areas with a variegated  white /tourquoise
thread.  In outer white area did stars in a golden thread, and used sort of a silvery gray
to do a heart-shaped leafs to hold down each prairie point.
Have had the quilt top done and sandwiched for a long time--over a year I think, but finally decided to get it done the other day.  My sweet husband, again, stretched it on our little quilting frame and pinned it for me.  After quilting, I bound it in the same brown that's the window frame.  It's a Christmas present--yay, I have one done!  My goal for rest of this year and next is to finish wip's for a change and try REALLY hard not to start something new.  Of course, people get married and have babies, so sometimes it means changes.

 Am in the midst of quilting a baby quilt--managed to tear a tiny hole in it when thread got caught, so had to take a break!  (dang, dang, dang!!!!!!!!!!!!!)  Will figure out some appliques now to cover it and have a couple others on there for balance.  Am really happy with the quilting so far.  Got some inspiration from Blogger's Quilt Festival quilts for what I'm doing on it and Leah Day's fmq videos.  Just love the internet for all the talent, tutorials, quilts, all things inspirational that's out there.

Thursday, October 25, 2012

Interlocking Seasons Quilt

Dear Hubby tried taking several different pictures--inside mostly, but  they just didn't turn out.  He wanted to hang it from monster paper clip things off of nails mounted on deck rail--NO!!!  Finally, he tried out over the railing and bench--think it turned out really nice and love how the rose bush was so accommodating to coordinate!!
Just love this quilt and excited to share it at Blogger's Quilt Festival!  When first seeing the Interlocking Seasons block tutorial on The Parfait Cafe  (http://theparfaitcafe.com/?p=228), I just knew it was something worth trying out.  Was needing a nice block for my nephew and his sweet wife--John and Nikki wedding quilt.  I made up a sample in reds/golds/black and it was complicated at first, but so stunning. Here's the post where I tell about making the blocks and how I lined things up: http://www.blogger.com/blogger.g?blogID=7854712989797547840#editor/target=post;postID=7142662119301878825  After the first few, I figured out to do it assembly line style--and it really helps to re-read the instructions several times with complicated blocks.  She had some very good hints that would have saved me a lot of un-sewing!
A finished block with black triangles.  Someone commented they                                                                                            wished there were pictures of one of them, so here it is!!
A finished inner block--at one point thought about just using these and not adding the black triangles, but really love it en point!  
 Nikki sent me a sample of her red--sure glad she did as it was more on the marroon scale.  It was so sad that I HAD to buy more fabric...HAHAHA!   Pattern uses 1.25 strips and makes up into 12.5 inch square.  I wanted a large block, so doubled it and used 2 inch strips (to double something, deduct 1/2 inch for seam allowances (.75), multiply by two (1.5), then add back in the seam allowances.  Did the same thing for all lengths and just plugged those into the chart.  My squares ended up being about 23 1/2 inches.  The inner square is beautiful alone and have lots of extras since at first I thought about making it without the black triangles putting it en point.  I'll be making runners and whatever with all the extras.  It's always fun for me to find I'm in love with new combos of colors I never thought I'd care for before!  
Showing back with funky red pieces (didn't want to buy more black and what I had wasn't big enough so added red strips from fabrics in the front)--this was quilted in four large squares made up of four blocks each.  I sewed two of the large squares together on the front by machine, then handstitched the back seam to make two long sections.  Then sewed those sections together and again stitched that long seam.  Because of shoulder problems, I can't handle a huge piece like this to machine quilt it and the quilt as you go (qayg) worked ok.

Showing whole back with the random red strips--specifically did not want it to be matchy matchy so other than making sure they would line up, I didn't care where they were as sandwiched each piece (actually as DH sandwiched and pinned each piece--he's definitely a keeper) 

It's fantastic that Amy is willing to host the quilt festival each year.  It's always full of amazing inspiration and so many opportunities to learn something new while "meeting" oodles of talented   quilters out there! Thanks so much, Amy!!! Go to her site from October 26 to November 9.  You will be amazed by the hundreds of participants there.  http://amyscreativeside.com/bloggers-quilt-festival/  For some reason, I have never figured out how to add those buttons you click on--need my daughter to fix it for me!!


It's about 94 inches square.  Decided not to add borders and very happy with that.  

Sunday, October 14, 2012

SNEAK PEEK

Back of latest quilt.  I wanted it to be "interesting" and fun.
Think it turned out that way!
 Quilt was done "quilt as you go" sort of--sewed four blocks together (each block was about 23 inches square) so ended up with a pretty good size square.  Backing was a piece of black with a strip of two reds--one piece much larger than the other.  Wanted it to be random in the back so didn't pay attention to how that red strip went onto each square other than to line it up so it'd be straight.  Sewed two of the big squares together on front, trimmed batting and then hand stitched the back seams.  Next I sewed those two double-square pieces together and finished back seams.  There is no way with my old shoulders that quilting could be done on the whole quilt.  

It's ready to bind, but may wait for a day or two since left shoulder is a bit unhappy after wrestling with the whole thing to sew the back.  Wanting it to be done for Blogger's Quilt Festival (http://amyscreativeside.com/bloggers-quilt-festival/ ) when I can show the whole thing.  It's for family and hoping they don't pay attention to my blog!!  But, it still won't be quite the same as seeing it in person.  The fabrics are really pretty and that Interlocking Seasons Block is one of my all-time favorite.
Nothing to do with quilting, but dark brown and red!  Aren't they adorable?  My grandson, Adam the younger, and I made them.  They  even have a creamy filling that he had fun cutting the holes and piping the cream into.  We made 18 of these cuties so he could take two home for each of his family and leave a couple for my brother--if he gets up here tonight!!!

Tuesday, October 9, 2012

Adam's Book Cover

Little Adam (named for his Uncle Adam who's very tall) with  fantastic
book cover he made yesterday
Adam practicing sewing a puzzle on paper--if you look closely you'll see the tip of  his tongue sticking out as he concentrates--a sure sign he's related to me!  First time at a sewing machine and he was quite precise on all those l
More practice showing window where he can look out and see our hills and mountains--when it's clear enough (in the kitchen area where we set up a temporary sewing room). We've had over a month of smokiness due to wildfires all around us.  Today was pretty good because of a slight breeze--don't want too many miles per hour movement or it exacerbates the fires.  So thankful for fire fighters who's worked so hard in central Washington to save people and their property.  Can hardly wait for possible rain this weekend!!
 Didn't get as many pictures as I thought I had for the process.  He did a great job of ironing, cutting, and sewing. We used the book "Sewing Machine Fun For Kids" from Possibilities for directions to make this and for pages we could print out for him to sew on.
I worked with his older sister, Sagie, and a book about one yard projects for her to make a bag; above you can see his older brother, Trey, working on a pouch bag he wanted to make and just figured out himself.  Those didn't get done as they had to go home.  We plan to "facetime" to get those finished.  We get to "keep" Adam for the rest of the week.  So nice to not have quiet all the time for a change.

Wednesday, September 26, 2012

JUST HAVE TO SHARE THIS

Interlocking Seasons big blocks--about 23 inches each of the blocks.  Will make four sets like this and then quilt each set then sew them together and add borders.  Not sure exactly what those will be.  Anyway...just wanted to share this for now.

Thursday, September 20, 2012

PAELLA--OLE!!!!!!!!!!!!

Challenge from Daring Cooks was to make paella.  Something I'd always wanted to try but seemed daunting.  It isn't!  Mine isn't as fancy--pretty simple with just shrimp and sausage, but very delicious.
Whole family was here, so made two pans.  In one I put white rice, in other brown. Brown took longer to cook and rice was a bit chewier--which I loved!!
Mise en place for paella.  That's just kielbasa sausage that was sliced and fried up.  
Generally, paella includes seafoods--clams, mussels, shrimp, some sausage, sometimes chicken, sometimes lobster tails.  It can probably be just about anything you'd like and even vegetarian.  There are all sorts of recipes and many youtube type videos out there.  Mine included what's shown above and shrimp.  Best we could get here were frozen.  It usually also includes saffron but the challenger said we could use paprika, so that's what I did.  There is a special pan "paellera" that can be humongous as in one video online, or much smaller.  I used two different type of pans--one is a wide, curved side 12" skillet, other is a large saute pan.  I'd like another 12 inch skillet if I were doing two again, or the gorgeous copper paellera I saw--it was "only" in the three hundred dollar range!  Whatever, it all turned out deliciously and was enjoyed by almost all--a bit spicy for a couple of my little girlie girls.  

You really should try this--I know you'll love it!

Blog-checking lines: Our Daring Cooks’ September 2012 hostess was Inma of la Galletika. Inma brought us a taste of Spain and challenged us to make our very own delicious Paella!

Monday, September 3, 2012

BEJEWELLED--triangles are a girl's best friend!

Couple weeks ago dear hubby came home with Bejewelled runner pattern
by Karen Montgomery and a strip set to complete it.
Back of runner showing quilting.  Started with the idea of following the seams, but I'm just not too good at that!
As it turned out,  just love the sort of haphazard way the designs worked on the triangles
and the sort of crazy quilting on the black.
Cute hubby taking above picture of the runner for me while
trying to not get his toes!
All pieces done in strips.  As it turns out I misunderstood the way to press the seams. It's diagrammed on the pattern, but will pay more attention next time!.  Because of how it's sewn, you can't change the direction after compiling each strip--unless you pick it all out (NOT happening)  It made for thick seams.

DD and DGD picked out 20 lovely batiks from my stash for me to make one for their home.  Lovely colors and anxious to see it come together.  The pattern shows batiks in purples and greens, but any colors would be nice.  It's 60 degree triangles out of twenty 2 1/2 inch strips.  I think any combination of colors and fabrics would work out well--maybe not too large designs, but who knows?  
 

Thursday, August 30, 2012

PUFF BALLS, HEARTS, SWANS!!!

This was one of the more entertaining and delicious baking challenges with the Daring Kitchens Baker's Forum.  Pate a choux is really easy--REALLY!!  I've made small puffs for years and years.  Mom always made them for any party she had and filled them with shrimp or crab salad and so did I.  Don't think had ever tried sweet ones, but with whipped cream and with chocolate ganache (also ridiculously easy) inside some and on top of others, it was fun.    I also froze a few of the sweet ones to give to family that came this last weekend--YUM!  You should really, really try these.

Shrimp salad filling on these.  Would make them smaller next time .
One of a few swans I made--isn't her beak cute?  Didn't plan that, it just happened.
All the pieces that one recipe made.  Cut them immediately or it's almost impossible to not have breakage--guess how I know that????????????

Pate a choux  (cannot be doubled)

½ cup (4 oz) butter     1 cup water      ¼ teaspoon salt
1 cup all-purpose flour    4 large eggs

Directions: Line at least two baking sheets with silicone mats or parchment paper, or grease pans well.  Preheat oven to moderately hot 375°F. In a small saucepan, combine butter, water, and salt. Heat over until butter melts, then remove from stove.   Add flour all at once and beat, beat, beat the mixture until the dough pulls away from the sides of the pot.  Add one egg, and beat until well combined. Add remaining eggs individually, beating vigorously after each addition. Resulting mixture should be somewhat glossy, very smooth, and somewhat thick.  Using a ¼” (6 mm) tip on a pastry bag, pipe out about 36 swan heads. You’re aiming for something between a numeral 2 and a question mark, with a little beak if you’re skilled and/or lucky.  Remove the tip from the bag and pipe out 36 swan bodies. These will be about 1.5” long, and about 1”  wide. One end should be a bit narrower than the other.   Bake the heads and bodies until golden and puffy. The heads will be done a few minutes before the bodies, so keep a close eye on the baking process.   Remove the pastries to a cooling rack, and let cool completely before filling.  Can make many different shapes--saw a turtle, crab (they used slices of stuffed olives for eyes) and someone colored their pate a choux red to make ladybugs!!   http://www.youtube.com/watch?v=hOKqFsQG3mA  and http://www.youtube.com/watch?v=eeRQA6cNLR0  are videos showing how to make first swans and then what's called brest.  

Blog-checking lines: Kat of The Bobwhites was our August 2012 Daring Baker hostess who inspired us to have fun in creating pate a choux shapes, filled with crème patisserie or Chantilly cream. We were encouraged to create swans or any shape we wanted and to go crazy with filling flavors allowing our creativity to go wild!